December 1, 2011

Coffee Filter Wreath

I know these have been in blog land for a while but I finally made my own coffee filter wreath. I actually made a natural one for me, a white one for my mom, and another natural colored one for the craft show. The pictures are of the one I made for the craft show.

Here is what you will need: a wreath, coffee filters, a glue gun, and glue sticks.


I used a straw wreath for the natural colored ones I made and a white Styrofoam one for the white one I made for my mom


natural colored coffee filters - this package had 200 I use more than this with the first one I made but this was enough for the second one I made.


I used some natural colored wrapping paper to wrap the straw wreath. I thought this would give it a nicer look from the back. I know who is going to see the back?


See it is looking better already.


I used a 14" wreath


I found the center of the coffee filter and placed a good amount of hot glue and placed it on the wreath. I started from the outside of the wreath and worked my way to the inside. (this picture was taken of the first one I made see I didn't wrap it to start with, but I did go back and wrap the back side.


This is the beginning of the first row.


I started the second row leaving a space of about 1/2 inch between the first row.  I didn't do this on the first one I made and that is the reason it took more than 200 of the coffee filters. Keep doing this until you get to the center, I did three rows with this wreath and five rows with the first one I made. I think they both turned out fine, if you want a fuller wreath then glue the filters closer together.


Here she is the finished product. I will try to take a picture of the first one I made and add it in later but my battery for my camera is charging.


I added a piece of natural jute to hang the wreath. I just ran it in between the filters and tied it in a knot then spaced it about four inches and did the same thing.
I hope you like my coffee filter wreath, it wasn't hard to make but did take a couple of hours for me to make. I did get up and walk away a couple of times so it might not even take that long. Oh and the best part. . . it didn't cost a lot to make. I hope you will try one for yourself.

Have a blessed day.
Penny

Reindeer and Snowmen

I have been working on some things for a craft show that my dad is going to and I wanted to send a few things with him. Yesterday I spent most of my day making "Magic Reindeer Food and Snowman Poop"!

This should have been a quick and easy project for me but of course it wasn't. I had read on another blog where someone had used the paper you wrap items to be mailed in (sorry I can't think of the name but you get the picture) they had used this to print on. Well I am obviously challenged in this area because this didn't go so well for me. I measured it and cut long strips off the roll.....


I then cut the paper into 8 1/2"  x 11" sheets to print the topper for my magic reindeer food. I should point out I have an older printer that has seen better days but it jammed almost every time I tried to print. The paper I bought came from the Dollar Tree so the more expensive kind might be thicker. Oh well on with the show....

This is what I used to make my magic reindeer food: cheap oats, colored sugar I bought mine at Wal-Mart but I have seen this at the Dollar Tree. I did find some clear bags at the Dollar Tree and it had 40 bags in the package. I also used a reindeer stamp that I purchased at Michael's but I forgot to put it in the picture.


I filled each bag with 1/4 cup of the oats


1/4 teaspoon each colored sugar, some of the recipes I looked at call for glitter and some of the ones I read suggested the sugar instead because it was better for the environment. I chose to use the sugar because it will dissolve when it snows or rains.


I folded the bags over and added a piece of tape to keep them closed then I added the top that I printed out.


As you can see I printed a couple on red paper but I really liked the rustic look the brown paper added. I plan on making some more and taking it to my students I don't really think they will mind which kind of paper I decide to use.

The saying that goes along with the reindeer food is:
Sprinkle on the lawn on Christmas Eve night
The moon will make it sparkle bright
As Santa's reindeer fly and roam
This will guide them to your home

Now onto the snowman poop.
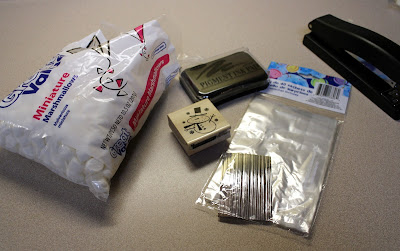
Here is what you will need: One bag of miniature marshmallows, more of the small bags like I used for the reindeer food (be sure to check at the Dollar Tree in the party supply area for ones like I used), snowman stamp and stamp pad and a stapler.


Because I am OCD I put 12 marshmallows in each bag. I know you are laughing but I ended up being able to fill 40 bags and I only had 2 marshmallows left so just think what could have happened if I hadn't counted. I used blue paper for the topper and printed the saying out onto it and then added the stamp.


I didn't tape these because I wasn't worried the marshmallows might  fall out. I also need to add that I cut the toppers for both projects 4" x4" folded them in half and stapled.
I think they both turned out cute, who wouldn't want to receive either of these?

I almost forgot here is what the snowman poop said:

Hear you have been naughty
So here is the scoop....
All you get this year is
SNOWMAN POOP

I hope you like these two projects and will make some reindeer food for your children, grandchildren or children who are special to you and well the snowman poop for someone who needs a laugh.

I have some more projects I am finishing up and will post about soon. Here is a peak at one I am working on. . . . . .


While you decide what I am working on I hope you have a blessed day.
Penny

November 27, 2011

I'm Back

I am back to the blog world, well I really never left I just haven't been posting to my blog. I have continued to stalk visit other blogs.
I recently had to take a leave from my job due to continued difficulties with firbromyalgia. I am hoping and praying that this time off will help. I truly love my job but as a teacher of five year old children you have got to be 100% and I haven't been that since school started. Some difficult decisions are in my future, I am hoping the new medication I am taking will make that decision easier. I share this so that others who suffer with this chronic illness know that others are fighting this battle too. I would be happy to answer any questions you have just leave a comment or send me an e-mail. I can only give my opinion and experiences I am not a Dr. but I have been living with this for or 14 years.

Now the up side.... I have discovered that crafting and blogging help take my mind off to the pain and difficulties I may be having. I will be posting some pictures later of projects I have been working on.

Wishing you a blessed day
Penny

April 27, 2011

Somethings Got To Give!

Ok I LOVE, LOVE, LOVE, all the projects that I see throughout blog land and let me tell you I have my share of some pretty good projects underway. 

Well the problem is I have been having some major problems with my fibromyalgia - just in case I haven't mentioned it in the past, I have been diagnosed with fibromyalgia going on 14 years. So what does that have to do with anything you may ask, well what happens is I have all these great projects that I would love to do. I have spent money to do these projects and bought things such as furniture that I want to fix up like all the cool things I see on the blogs I love. Well this is what happens I am having a good day as in I feel like a normal person and I have all these things I want to do so I start a project. Then good ole fibro comes and says "I don't think so" and puts me on my bottom. So where am I going with this post?


Clutter stresses me out and stress makes my fibro kick in! So something has got to give. My plan is to begin a huge de-clutter / organization of my home and life. I have already started the process, and let me tell you it is like a huge weight being lifted off my shoulders. That is how I came to the conclusion that this is what I need to do for my health.
So I will begin downsizing!!!!! and I hope you will join me for the process and hopefully I can share some organization ideas.

April 15, 2011

On the mend

A quick post to say I am still here. I have been sick for over three weeks but I am beginning to feel much better. I am still not jumping any fences but so much better than I was a week ago. I hope to have some pictures to share soon, until then have a great day!

March 27, 2011

Get your spray paint on!

I have had my spray paint out this past week. I am sick again or I never really got better so I am inside on my couch coughing and sneezing and feeling like yulk. So I will just post some pictures today.


Have a great week!

March 23, 2011

We have some new friends at our house

I haven't been very successful in completing projects this week but I did make it down to the barn today to see our newest pets and one old friend.
This is an old friend Mr. T he only come to our house when he has to. I don't think he likes our dogs.


This is Ginger and she is a mess, she was checking out our new friends. Just like a kid I couldn't get her to look at me so I could get a better picture.


That black spot, well that is Oreo (yes we named her after the cookie)


These are our new friends.


My hostas are really beginning to grow


This one may have to be divided later

Well I hope everyone is having a great week and enjoying some nice weather, we had some bad storms today and the temperature is supposed to drop again but warm weather isn't far away.

March 11, 2011

Goodwill Treasures

I did it I finally made it home before it became so dark I couldn't take pictures.
I did get to enjoy this!
Here is what I bought last Saturday at Goodwill.
I love the two chairs and I can always use some extra seating around my home. I bought the shuffle board game and thought I might use it for a sign. Wouldn't this look great in a game room?
Love these pieces!
Here she is, the poor piece that no one wanted because they couldn't see her potential.
Just look at those legs sigh aren't they nice? She will cause folks to do a double take once she gets some TLC and warmer weather.


I can't wait to get to work on some of these pieces. I am so glad I finally was able to take some pictures to share. I hope you have a great afternoon.

* I edited most of the pictures,  the originals were dark and didn't look very good. I am still working on taking better pictures.

March 8, 2011

I Love my Dad

Rain, Rain, and more rain I haven't been able to take pictures of my items that I bought from Goodwill, they are in my garage now and by the time I get home most days it's to dark to get any good pictures. So I am blogging about my dad. I am so much like my dad, always wanting to build something or make something.  I definitely take after him. My dad makes some beautiful walking sticks, and knives using antlers that have been shed by deer.


 He even makes these to put them in (I'm sure they have some official name but I don't know what it is and my dad would probably kill me).
I also wanted to share a bowl that my dad made for me a couple of years ago. Here are a few pictures of how I have used it.


Love this bowl
 Pretty talented guy of course I am partial to the maker.

Hope you enjoyed seeing my inspiration to build, make, and create. Love my parents.
Maybe the weather will be better soon or I will get home before dark soon so I can take some pictures, but I think it is supposed to snow this week.
Spring can't be that far away can it? 

Because my dad is a Treasure to me I am linking up here:

My Uncommon Slice of Suburbia

March 6, 2011

First Saturday of the month

Today was the first Saturday of the month!
If you don't know why this day would be any different than any other day then let me tell you. . . .
It is HALF OFF the ENTIRE STORE at Goodwill.
Now I have to say my last couple of trips to Goodwill haven't been that great,  but this Saturday I found some great pieces that I can't wait to show you. I have no pictures to share at this time because everything I bought is still in my vehicle due to the fact that it is pouring rain and has been most of the day.
So as soon as the weather clears up a little I will be able to take some pictures to show you.

I will share this, as we were loading some of my treasures a woman leaving the store said and I quote
"Someone actually bought that?"
well yes mam someone did and I don't really blame her for the comment because she could only see for what it is now, not what it is going to be.  Just wait you may agree with the lady leaving the store but I hope you will come back to visit and see how it is changed.
Have a great day.
** I came back today and edited what I had written this morning at 1:20a.m., have I every mentioned I have insomnia!! Well after I re-read my post it sounded a tad jumbled and squished together. Hopefully it makes a tad more sense. My mind tends to run at high speed at night for some reason hence the insomnia.

February 26, 2011

Goodwill Cake Stand

If you have visited my blog recently then you know that I bought several 'treasures' from my local Goodwill stores. I bought things that I hope to use at my sons wedding shower and the wedding reception. So I thought I would try making a cake stand. I like how it turned out, take a look and see what you think.
Yellow apples are my favorite.

I really like glass that has the air bubbles in it so when I saw this I really wanted to buy it, but I needed to know I had a use for it.
So when I found this platter that had the same bubble look that was all I needed. I new what I would do with my new treasures. Oh and there is probably a better name for this type of glass but I am unsure what that would be and when I was looking for more glass like this on Google that's what it was called so if you know what the correct name for this just leave a comment and let me know. Thanks
I picked up a tube of this at my local Wal-Mart. Love that place but I always spend to much!

I turned the glass upside down and put some glue around the bottom edge of the glass.
This picture shows a close up of the bottom of the platter and a nice view of the bubble effect I was talking about. 
I originally drew a line using a dry erase marker on the top side of the platter to find the center but when I turned the bottom over there was a nice little circle from when the platter was made. I used this as a guide to find the center of the platter (If you look close you can see it in this picture).


I placed several plates on top of the platter so that it would get a good seal. A left it for a day and WaLa there you have it!
You like no? (said with an accent)
It was a little taller than I expected it to turn out, but I am thinking I can place some flowers around the bottom and then place something nice and tasty on top. But for now this is a great place for my apples to stay. I have some oranges just waiting to join!

I had some beautiful weather today here in Tennessee I hope you did too. I know there will still be some cold days ahead but I am hoping the worst is over. 

I painted some things today and will be adding this project soon so come back by  and see what I am up to next. 


Please leave a comment! I really love to here from you plus I like to go see what you might be up to.


Thanks
Penny

I will be linking up in the following places:
Funky Junk's Saturday Nite Special